Dungeon Generator
Dungeon Creator Tool
Technical Design
Introduction & Development Objective
My goal for this project was to create a customizable procedural dungeon with creative choices as well as elements of randomness to create a different experience every time, similar to a rogue-like experience.
Summary
Solo Projects
6 weeks half-time (4hours/day)
Made using Unreal Engine 5.6
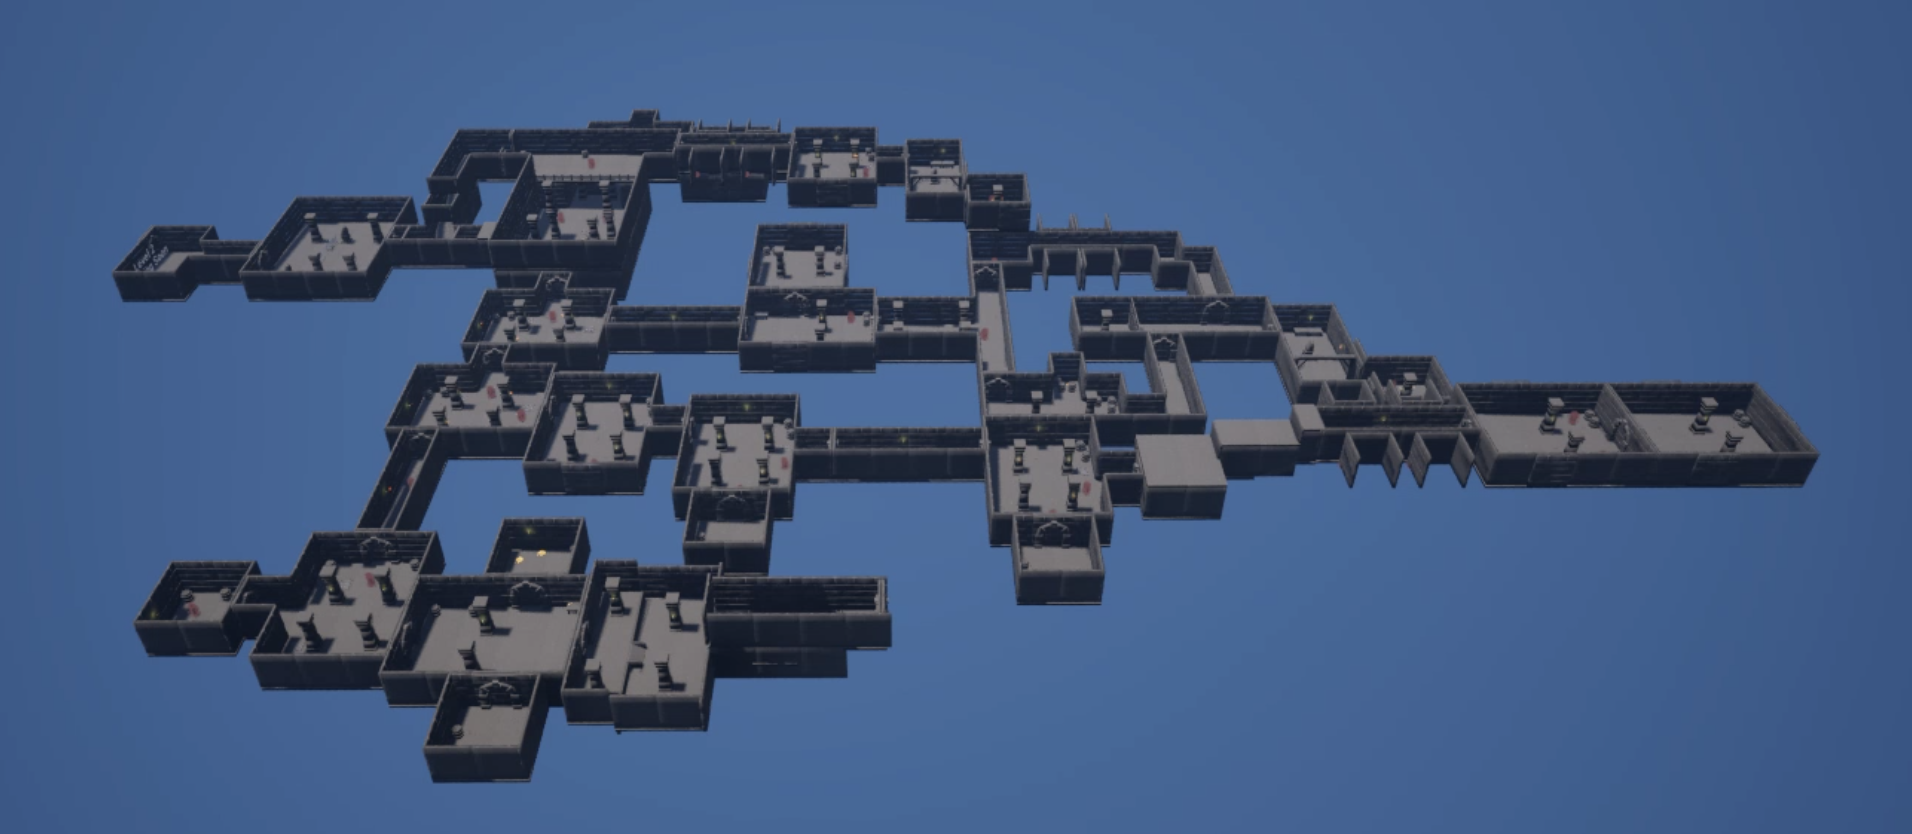
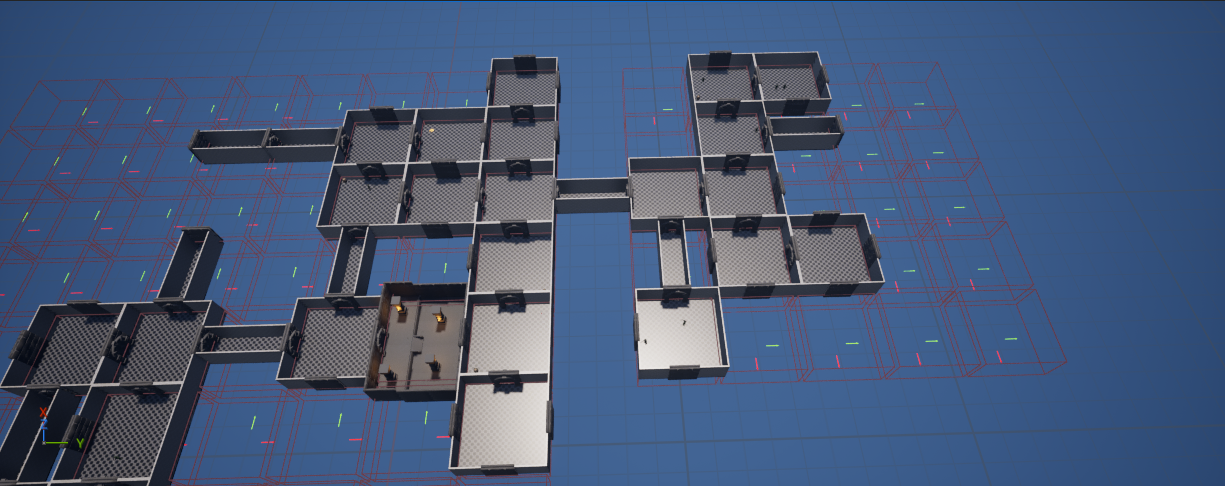
Generated Dungeons
Without Chunks
Generated with 10 rooms
Generated with 20 rooms
With Grid
Generated with 10 rooms
Generated with 20 rooms
Walkthrough
Features
customization of the dungeon
The tool offers multiple ways to customize the dungeons layout, as well as the room generation process. The user can fine-tune the settings by increasing or decreasing the chances of certain things to spawn or choose to remove them completely.
Selection of room-types to be generated inside the dungeon
How many rooms the dungeon will have
The maximum of time it would take to generate the dungeon
If the generation will be random or a special seed
How many items, enemies and special items shall spawn in the dungeon
How big the area of the dungeon shall be
If there will be another area and how big that area shall be
How many tries the dungeon has to place a room before restarting
Use Chunks
customization options
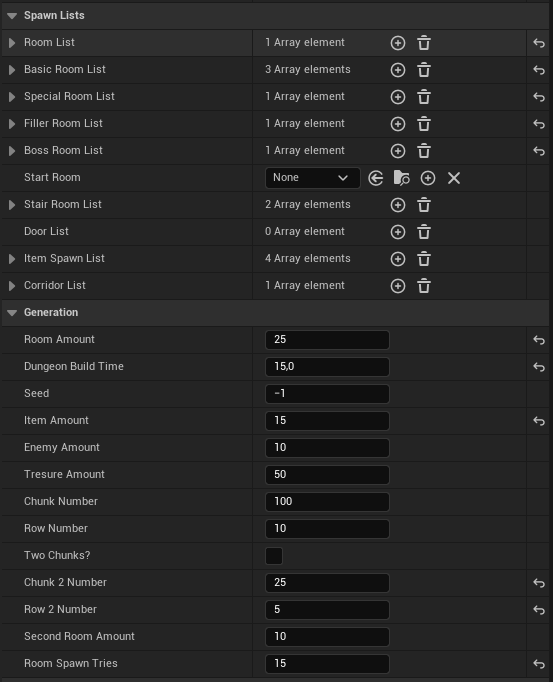
With just a few small adjustments, the dungeon can be generated in a completely unique way, making each experience different from the last.
Functionality
I duplicated the Master Room and started to build the first rooms of the dungeon. By placing objects in the folders I created spawn points for the various things I wanted to spawn next. In the script I could randomly select one of these spawn points to get its location for where the next room was going to spawn.
Once a spawn point is selected and used, it will be removed from the list of potential spawn points, in order to prevent duplicates.
Each new room also comes with its own set of spawn points, which are added to the list of possible future rooms.
Once the desired amount of rooms has been spawned, enemies and items will spawn in a similar way. Their spawn points would be selected at random and generate enemies and items from another pre-made list of options.
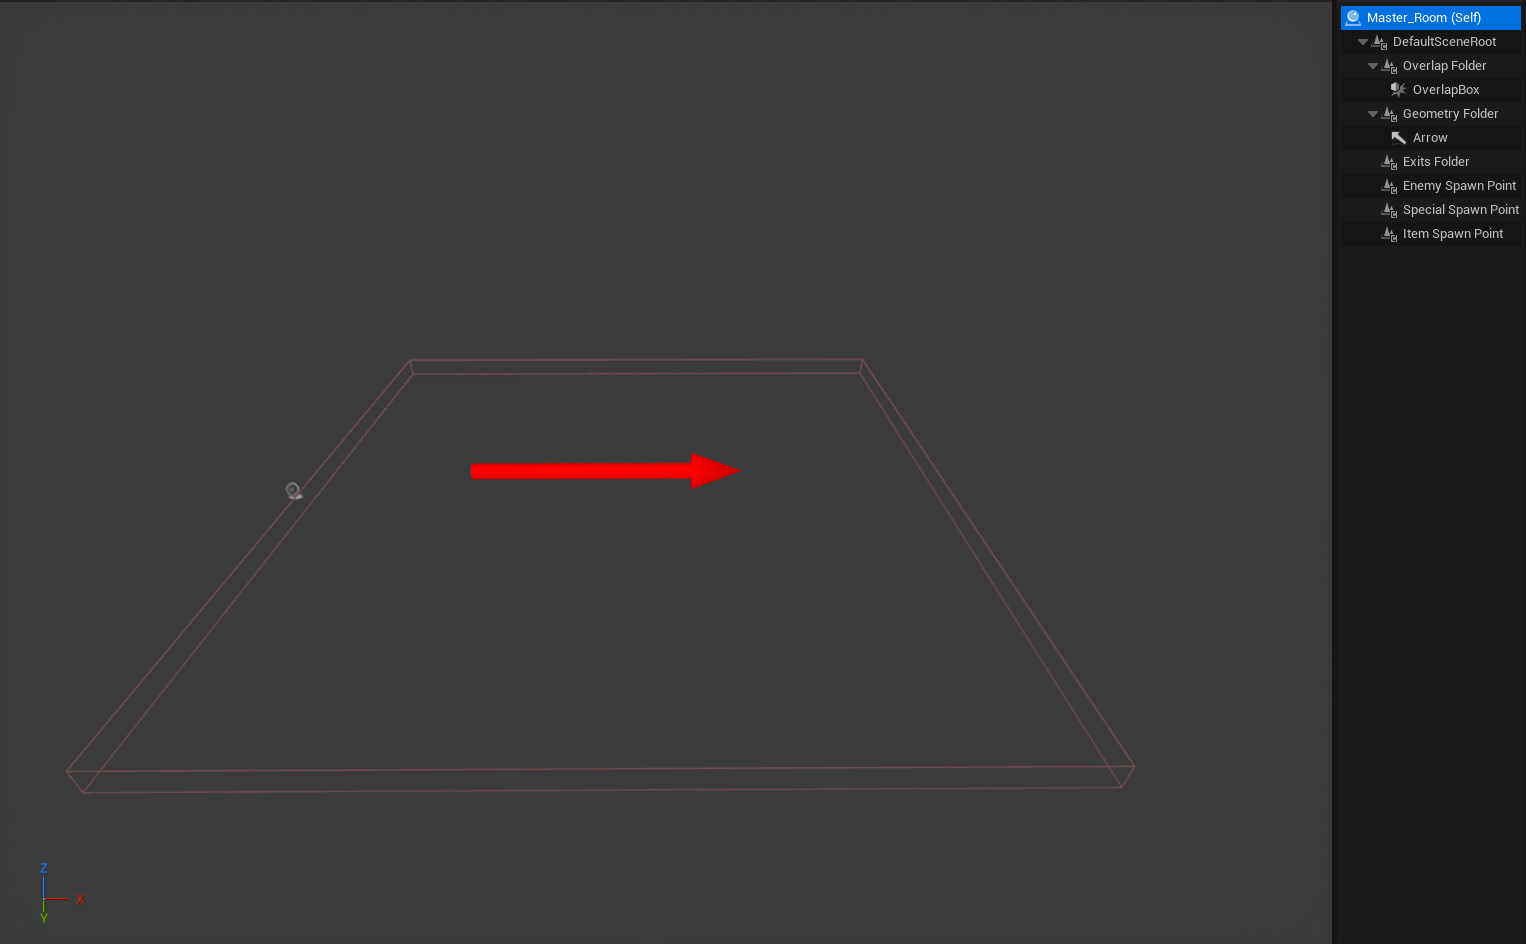
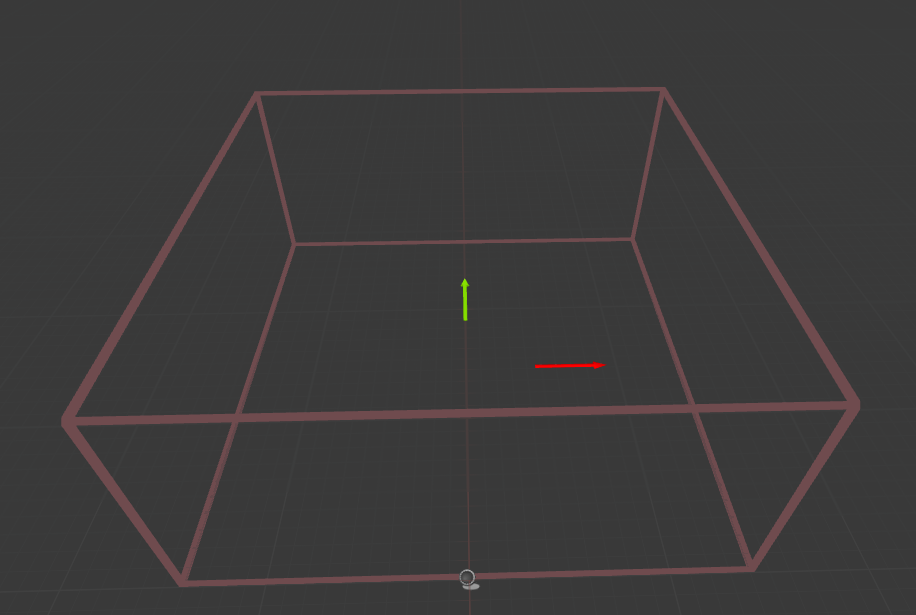
The dungeon generation system was built around a “Master Room” actor that contained the core elements needed for the rooms.
The Master Room held empty folders for Geometry, Exits, Items, and Enemy Spawn Points, which helped organize each room’s components. The BluePrint contained only a Box Collider to detect room overlapping during generation and an Arrow Component for debugging purposes and to show the direction the room would spawn.
Script Showcase
The script begins by generating a grid, which forms the foundation of the dungeon area.
Next, it reads the dungeon’s seed and starts a timer that limits how long the generation process can run. This timer acts as a failsafe in case the dungeon is generated in a way that prevents completion.
The generation process then begins by placing the first room at a random position on the grid. It selects an exit from this starting room and spawns a new room connected to it. This process continues, with each new room adding more exits, until the predetermined number of rooms has been reached.
Once all rooms have been placed, the generator adds doors, walls, items, and enemies to complete the dungeon.
Master Room
Test Room 1
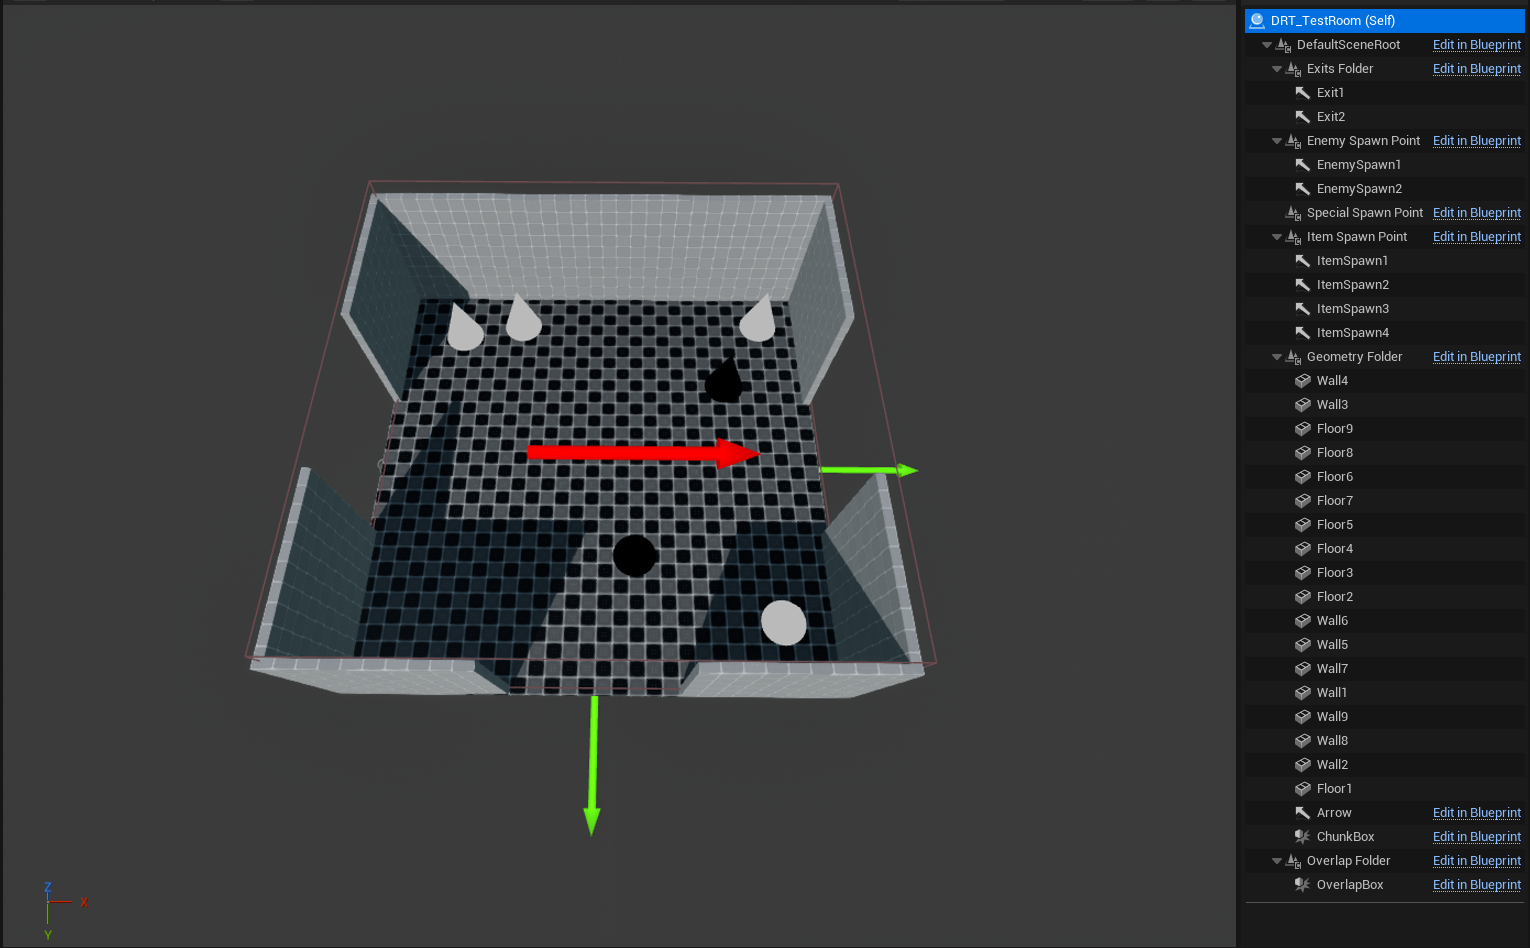
Spawn Points:
Green Arrow - Room spawn
Black point - Enemy spawn
White point - Item spawn
Complete: blueprint
Early Stage
After I got the tool to successfully generate a functional dungeon with basic shaped rooms, I began to create my own modular kit in Blender to see how well it would generate a dungeon with non-symmetrical rooms.
In the early stages of the build, I used basic shaped rooms to see if the script was capable of generating a rough outline of a dungeon. By using basic shapes, I was also able to easily detect if something went wrong during the generative phase. The shapes allowed for all rooms to line up with each other, if it proceeded correctly.
item and enemy spawn variation
Once the generation process worked successfully, I wanted to make the rooms feel unique, even though the same layouts were being reused. To achieve this, I randomized both the number of enemies and the types of items that spawn in each room.
The enemy and item spawners work in the same way. Each time a room spawns it comes with a number of item and/or enemy spawn points, which are gathered in two separate lists. The generator can then pick at random from these two lists of spawn points, and spawn an item or enemy. It does this until the predetermined number of items and enemies have been reached.
Complete: blueprint
Problems
Early on, I noticed that the tool had a high factor of randomness. There were limitations when it came to choosing directions or the order of rooms. In the early stages, the only thing I could influence was the likelihood of a particular room spawning.
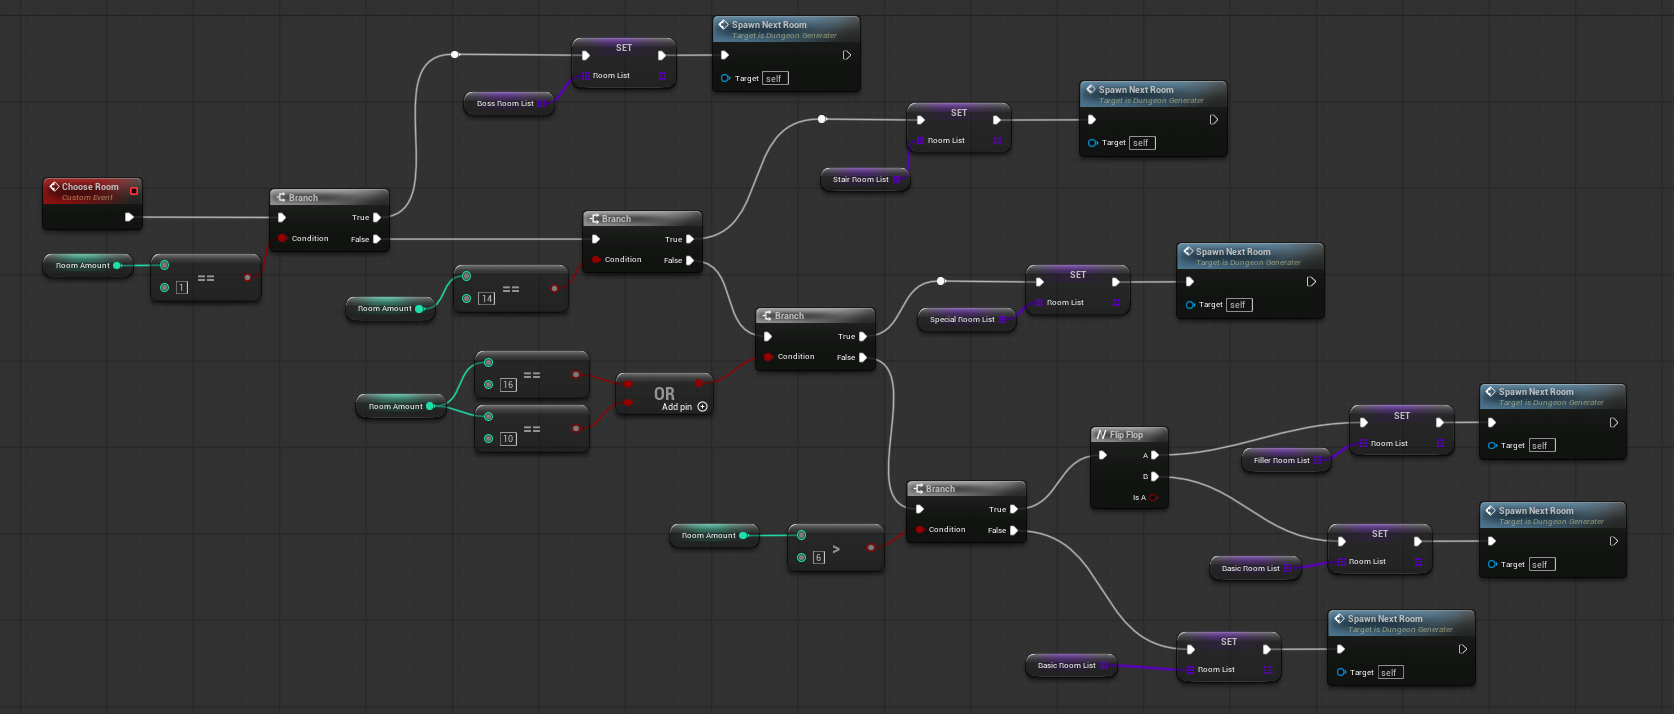
Unfortunately, this made the generation not very modular and very dependent on the size of the dungeon.
After this I learnt about the wave function collapse and I began working on how to implement this in my dungeon generator.
To solve this problem I separated the rooms into different categories. I made several lists that the generator tool could choose from: basic rooms, corridors, stairs, special rooms, etc.
The user can select that the tool will choose a room type (for example, stairs or a special room) if it has a specific number of rooms left to generate.
For example, if there are 14 rooms left to generate, the next room should be a stairs room. If it has more or less, it will move on to another list.
Similarly, another example is that one could input that if the tool only has one room left to generate, it will choose a room from a “boss room list”.
Wave function Collapse
Wave Function Collapse is a procedural generation algorithm to create complex and coherent layout with only a small amount of input samples or a set of rules it has to follow.
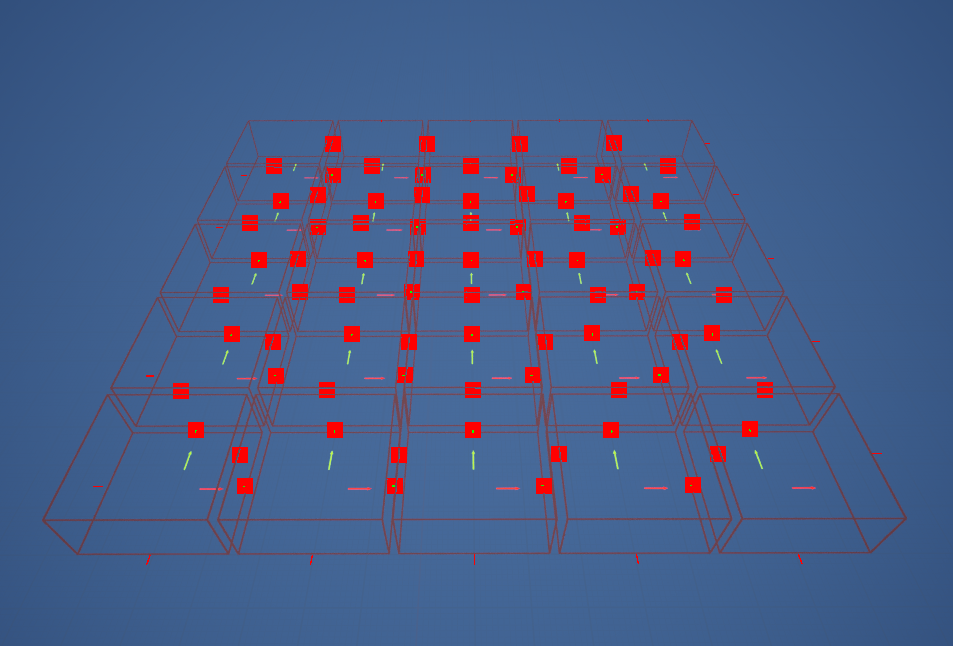
Grid Functionality
Chunk
I started by creating a box collider big enough to fit one of my test rooms and called it a Chunk.
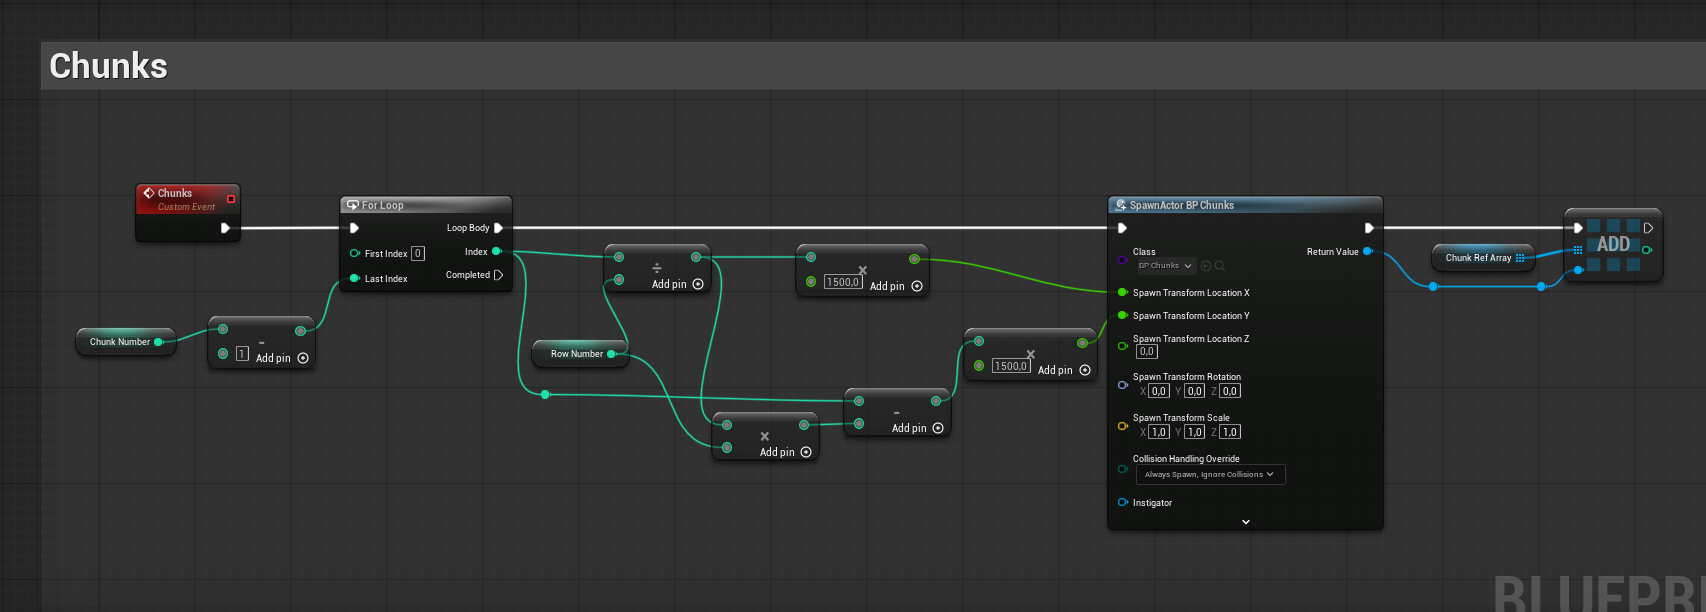
Generated Grid
I added an event in the beginning of the dungeon generation to make the chunks spawn in rows and columns to create a grid.
Grid’s generation
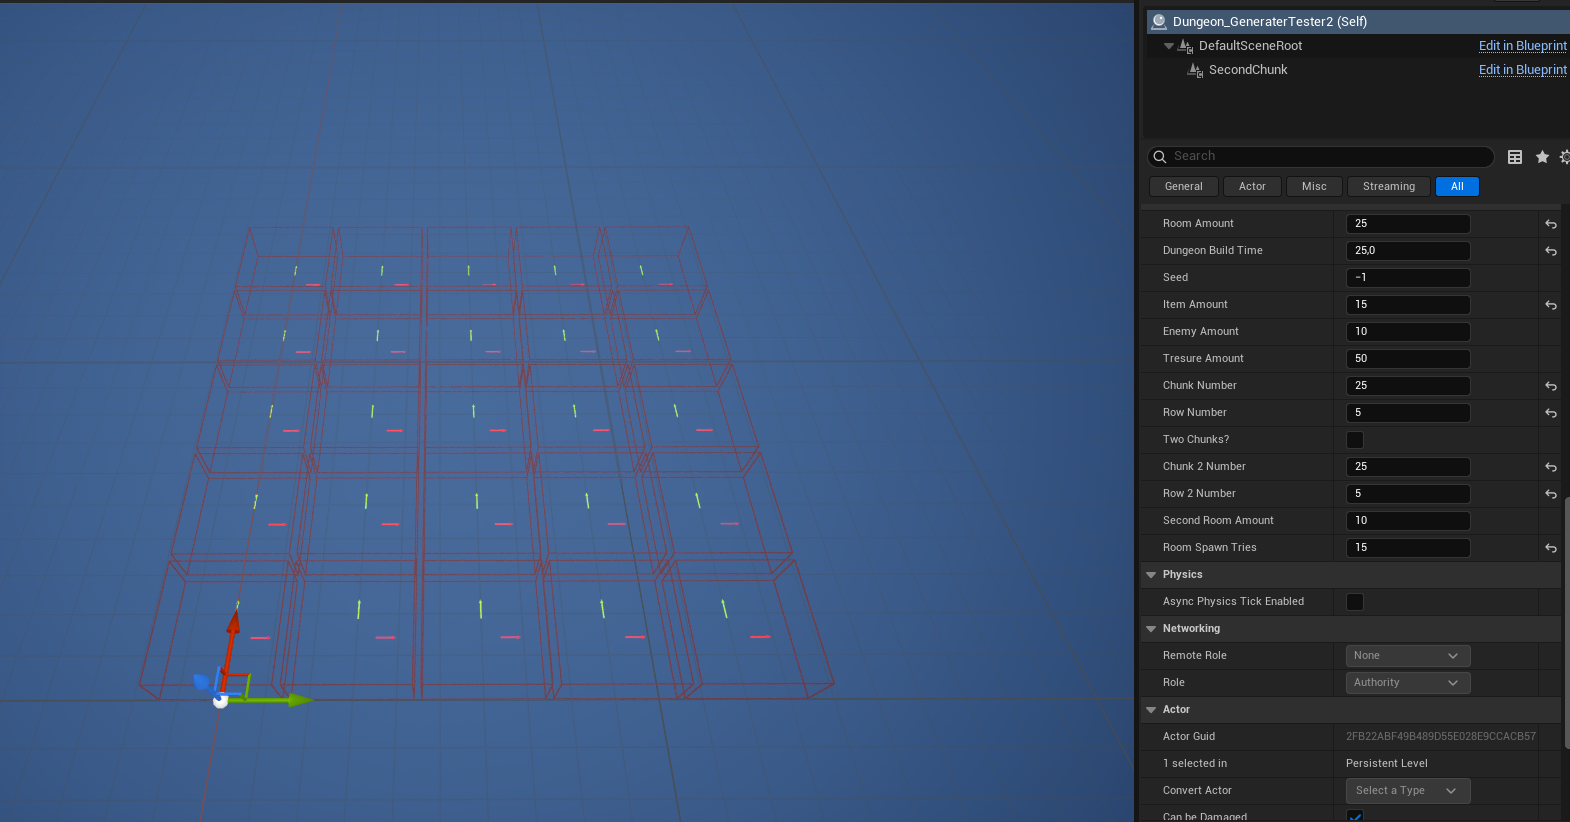
Once I managed to create a suitable grid I needed to make sure the rooms only spawn inside the chunks.
Room generation with the grid
I tried several different ways to get the rooms to spawn inside the chunks correctly. The best solution I found so far was to check whether a room overlapped with a chunk. If it did, a Boolean variable called “Chunk Check” would be set to true.This would allow for the room to stay and for the script to continue. It would also reset “Chunk Check” to false before testing the next room to be generated.
If a room did not overlap, “Chunk Check” would remain false, the room would be deleted, and the generation process would try again.
generation exaple
BluePrint: Chunk check
Grid Features
When I was able to spawn the rooms correctly inside the grid, I wanted to give the grid more functionality.
By giving the chunks different Boolean checks, I could decide what kinds of rooms would spawn on them. I set up the generation system so that only a “corridor room” could spawn on a “corner chunk.” If any other type of room spawned there, it would be deleted and the generator would try again. I also added a rule so that once a “corridor room” had been generated on a “corner chunk,” all of the remaining “corner chunks” would be deleted.
I made the generation that only the “corridor room” was able to spawn on the “corner chunk”. If any other room would spawn, it would get deleted and the generator would try again. I also added after a “corridor room” was generated on a “corner chunk” all the rest of the “corner chunks” would get deleted.
I began by identifying the edges of the grid as “Corner Chunks”* through the use of line traces and Boolean checks. Each chunk sends out four line traces in the X, -X, Y, and -Y directions. If a line trace hits another chunk, the corresponding Boolean value is set to true based on the direction of the hit. Since chunks located on the edge of the grid do not have adjacent chunks on every side, at least one of these Boolean values remains false.
If all Boolean checks are not true, the chunk is classified as a “Corner Chunk”.
*Technically, this is an edge chunk, but due to circumstances completely beyond my control (read: I accidentally named them wrong), they are called corners in my script.
BluePrint: Chunk Position check
The last thing I did with this project was the option to add a secondary grid that spawned at the chosen “corner chunk” location.
With this feature a whole new dungeon could be generated on a second grid. Completely different rooms can be selected in this grid, giving the option to add a new area.
I accomplished many of my personal goals during this project, including my main objective: creating a customizable procedural dungeon generator. I am proud of the result.
At the start of the project, I didn’t fully understand its scope or how complex it would become. There are hundreds, if not thousands, of additional features that could be added to make the dungeon generation more customizable and random.
One challenge that troubled me early on was generating loops within the dungeon, ensuring that adjacent rooms connect logically with doors. I spent too much time trying to make this feature work, and ultimately, I was unable to complete it. If I could go back, I would focus less on this challenge and instead prioritize adding more customization options to the dungeon generation.
Throughout this project, I have learned a great deal about scripting and procedural design. I plan to continue developing this tool, adding new features and expanding the ways users can customize the dungeon generation.
Thank you for reading!